Repairs with composite materials – welding metal plates to concrete elements
RELATED MATERIALS
EPOMAX-EK Two-component epoxy putty
EPOMAX-L20 Two-component epoxy injection resin for cracks 0,1-1,0 mm wide
EPOMAX-L10 Two-component epoxy injection resin for cracks 0,5-3,0 mm wide
I. NATURE OF THE PROBLEM – REQUIREMENTS
Structural elements, which have cracked, may be repaired-reinforced by welding thin plates onto the surface.
II. SOLUTION
The thin plate to be fixed must be made of 1-1,5 mm thick stainless steel.
Bonding of the plate to the substrate is achieved by the use of injectable epoxy resin EPOMAX-L10 (space between plate and substrate 0,1-1 mm) or EPOMAX-L20 (space between plate and substrate 0,5-3 mm) combined with EPOMAX-EK epoxy putty.
III. APPLICATION
The complete repairing procedure is the following:
Any existing plaster is removed from the entire area which is going to be covered by the plate.
The surface of the concrete is grinded and smoothed and then cleaned very thoroughly with water under pressure or, if this is not possible, with compressed air.
The inner surface of the plate is sandblasted in order to be roughened.
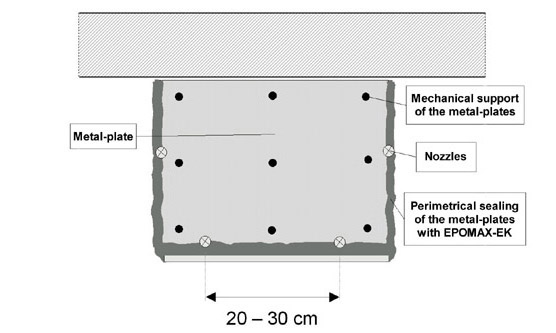
The plates should be fixed to the surface mechanically, with nails or e.g. with bolts. Then the edges are filled all around with EPOMAX-EK epoxy putty and the injection nozzles are placed for the resin injection. The space between the nozzles should be 20-30 cm, depending on the size of the plate.
Once the EPOMAX-EK has hardened, the resin injection is carried out, using EPOMAX-L10 or EPOMAX-L20 epoxy resin:
a) The resin outlet tube is placed in the first nozzle. If the plate is on the bottom side of the beam, the procedure starts from one end. If it is on the sides, it starts from the lowest nozzle.
b) By manipulating the resin outlet tap on the pressure pot, the resin is forced into the nozzle until it starts to come out of the next nozzle.
c) The first nozzle is placed with a special cap, then the resin is forced into the immediately adjacent nozzle until it starts to come out of the next one, and so on.
d) The same procedure is carried out on all the nozzles. The next day the nozzle projections can be removed, by being broken off, and any pre-existing plaster may be restored.
IV. REMARKS
To avoid temperature expansion and contraction in the metal plate, it is recommended that the existing plaster is replaced by a strong 2cm thick mortar, reinforced with ADIPLAST polymer latex.
Throughout the application, one person should hold the outlet tube steady in the nozzles, cap the nozzles and direct a second person on the manipulation of the resin outlet tap.
The mixture of the epoxy materials must be carried out with great care, so that the whole of components A and B are used each time.
It is recommended that EPOMAX-L10 or EPOMAX-L20 resins, are not poured directly into the pressure pot, but once the two resin components have been mixed in component A’s container, then this container is placed in the pressure pot. This way soiling and possible hardening of any remaining resin in the pot is avoided.
Attention should be paid to the length of time required for application, in consideration with the pot life of the material and the ambient temperature, so that the material does not harden during the resin injection procedure.
It is essential to clean the pressure pot and other equipment once the application is completed. This should be done with the SM-12 solvent (rinsing of the pressure pot and outlet tube with SM-12).
Protective gloves and goggles must be worn during the injection procedure.
Before application, study the safety advice mentioned on the product’s labels.


